
Tips
How to Take a Professional Headshot With Your iPhone
The camera in your pocket is good enough for a professional headshot. Here's exactly how to set it up, light it, frame it, and finish it, no photographer required.
The camera on your iPhone shoots sharper than the professional cameras photographers were charging hundreds of dollars to use a few years ago. The hardware isn't your problem. The gap between a quick phone photo and a real headshot comes down to a handful of choices: where you stand, how you light it, how you frame it, and how you finish it.
That's good news, because it means you can take a headshot that holds its own next to a studio shot without booking a studio. You don't need a photographer. You don't need an AI generator inventing a fake version of you. You need your phone, a window, and about twenty minutes.
Here's the full walk-through for 2026, start to finish.
Can you take a professional headshot with an iPhone?
Yes. A recent iPhone has the sensor, lens, and Portrait mode to capture a headshot that reads as professional, as long as you control the light, framing, and angle. Use the rear camera in soft window light, fill 60 to 70 percent of the frame with your face at eye level, and take 20 shots instead of two. The phone is rarely the limitation. The setup is.
What separates a casual photo from a headshot (it isn't the phone)
Pick up two photos of the same person, one casual photo and one real headshot, and the difference almost never comes from the camera. It comes from three things the casual photo got wrong.
Light. A casual photo uses whatever light was in the room: an overhead bulb that drops shadows under the eyes, a bright window behind the subject that turns them into a silhouette. A headshot uses soft, directional light on the face. This is the single biggest lever you have.
Framing. A casual photo is taken from wherever the phone happened to be, usually too far away and slightly below the chin. A headshot fills the frame with the face, shot at eye level. Distance and height do most of the work here.
Expression. A casual photo catches whatever the face was doing. A headshot catches a deliberate, relaxed expression, which almost always takes more than two tries to land. Everything below is in service of getting those three right.
Step 1: Use the rear camera, not the selfie cam
The front-facing camera is built for video calls and quick selfies, not for the photo that's going to represent you on LinkedIn and your company directory. The rear camera has a bigger sensor, more megapixels, and better lenses, so it captures more detail, truer color, and cleaner edges, especially in the soft indoor light you'll be shooting in.
The catch is that you can't see the screen while you shoot with the rear camera facing you. That's a feature, not a bug, and we'll solve it in Step 3 with a timer or a remote shutter. Resist the urge to flip to the selfie cam just because it's easier to frame; the quality difference shows up the moment your photo is viewed at full size.
Step 2: Find soft, even light
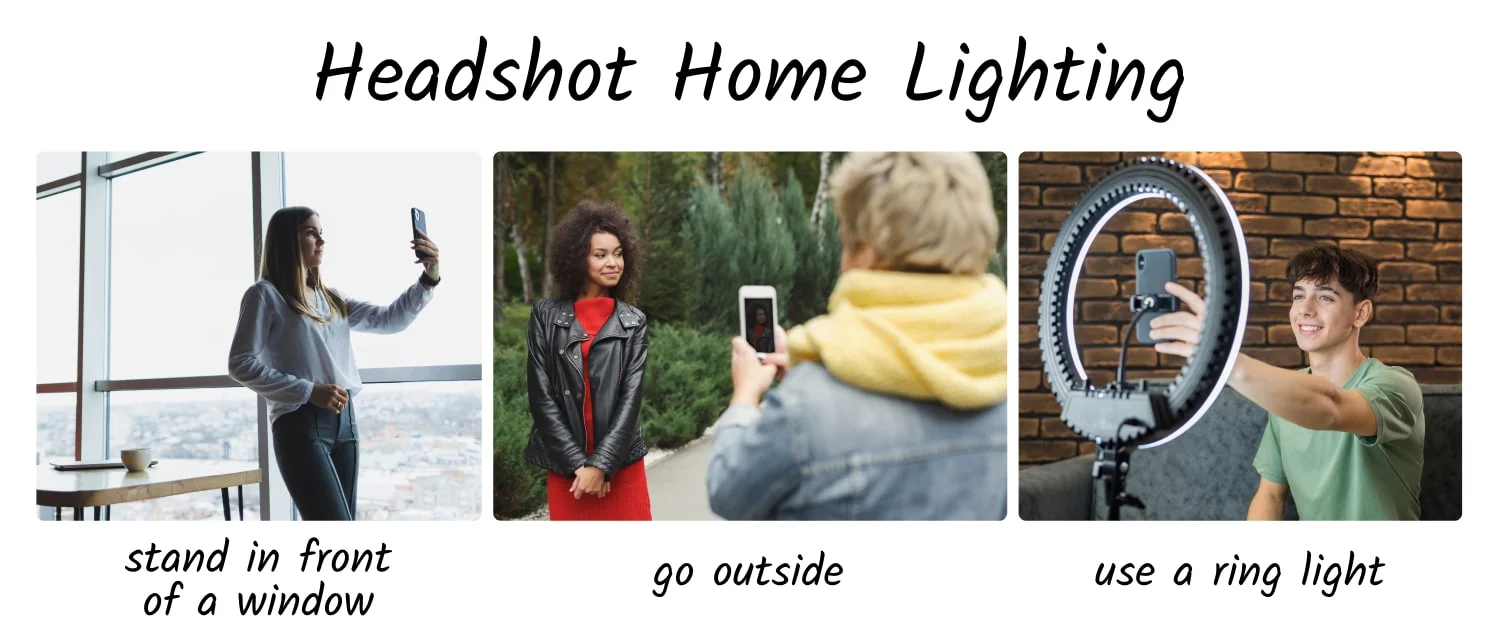
Light is where most phone headshots are won or lost. You want soft, even light coming from in front of you, not above you and not behind you.
The easiest setup: a window. Stand facing a large window, with the window roughly at or just above eye level. North-facing windows give the softest, most even light. Don't put the window behind you, or the camera will expose for the bright background and leave your face dark.
Even better: an overcast day. Clouds act like a giant softbox, wrapping your face in flattering, shadow-free light. If you can step outside on a gray day and stand in open shade, you'll get light that's hard to beat indoors.
Avoid: direct overhead lighting (it drops raccoon shadows under your eyes), direct sun (it makes you squint and creates harsh contrast), and mixed light sources of different colors (a warm bulb plus a cool window confuses the white balance). A ring light is a fine backup if you have no good window, positioned slightly above eye level and pointed straight at you.
Step 3: Dial in your camera settings
A few settings turn the default camera into a headshot camera. Set these before you take the first shot (the checklist above has the short version).
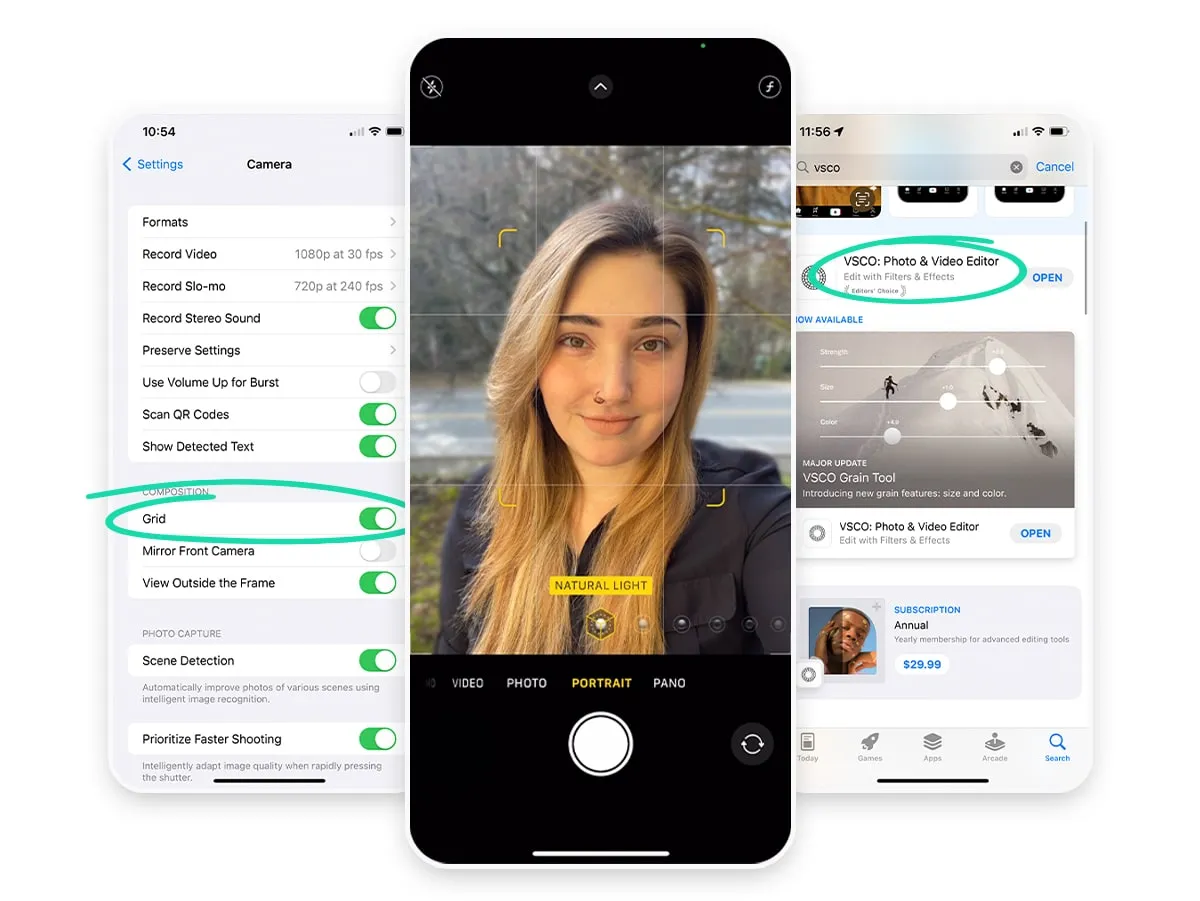
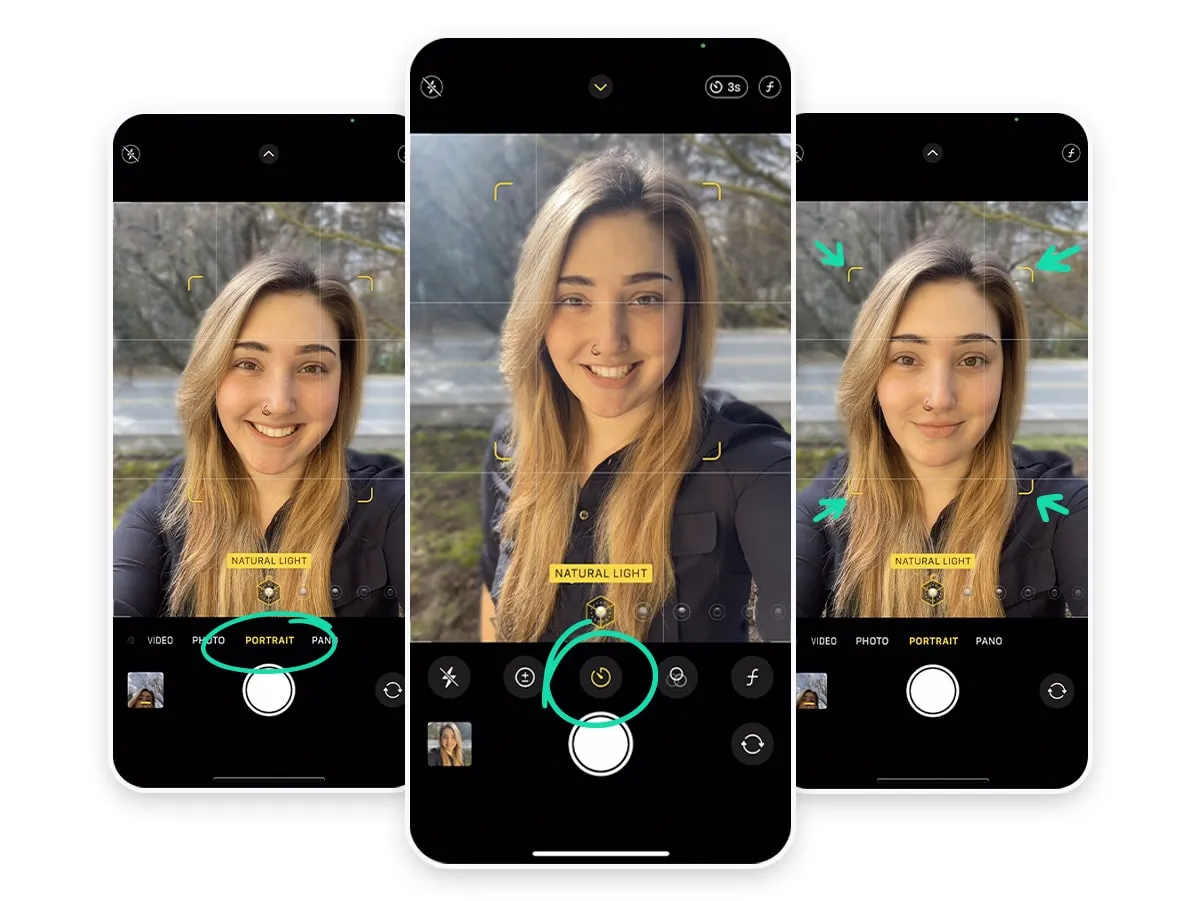
Turn on Portrait mode. Swipe to Portrait in the camera app. It uses software to blur the background into a soft, professional-looking falloff that keeps every bit of attention on your face. Stand a few feet in front of your background so the blur has room to work.
Turn on gridlines. Go to Settings, then Camera, and switch on Grid. The two vertical and two horizontal lines help you place your eyes and center your face using the rule of thirds, which we'll cover in Step 4.
Tap to focus, then lock exposure. Tap your face on the screen to set focus. A sun icon appears; drag it up or down to fine-tune brightness. Press and hold on your face until AE/AF Lock appears at the top, which locks focus and exposure so they don't drift between shots.
Use the timer or a remote shutter. Because you're shooting on the rear camera, prop the phone up and use the 3-second timer, the volume button, or an Apple Watch as a remote shutter so you're not touching the phone when it fires. Touching the phone introduces shake and pulls you out of your pose.
Different industry, different rules
A relaxed, approachable look that's perfect for a creative role can read as too casual for a law firm or finance team, and vice versa. Our industry guides break down what each field expects for attire, background, and expression, with real examples.
See the industry guidesStep 4: Frame the shot at eye level
Two framing rules fix the majority of amateur headshots.
Shoot at eye level. The phone's lens should be level with your eyes, never below them. Shooting from below exaggerates the jaw and nostrils and reads as unflattering; shooting from slightly above is forgiving. Prop the phone on a stack of books, a tripod, or a shelf so it sits at eye height.
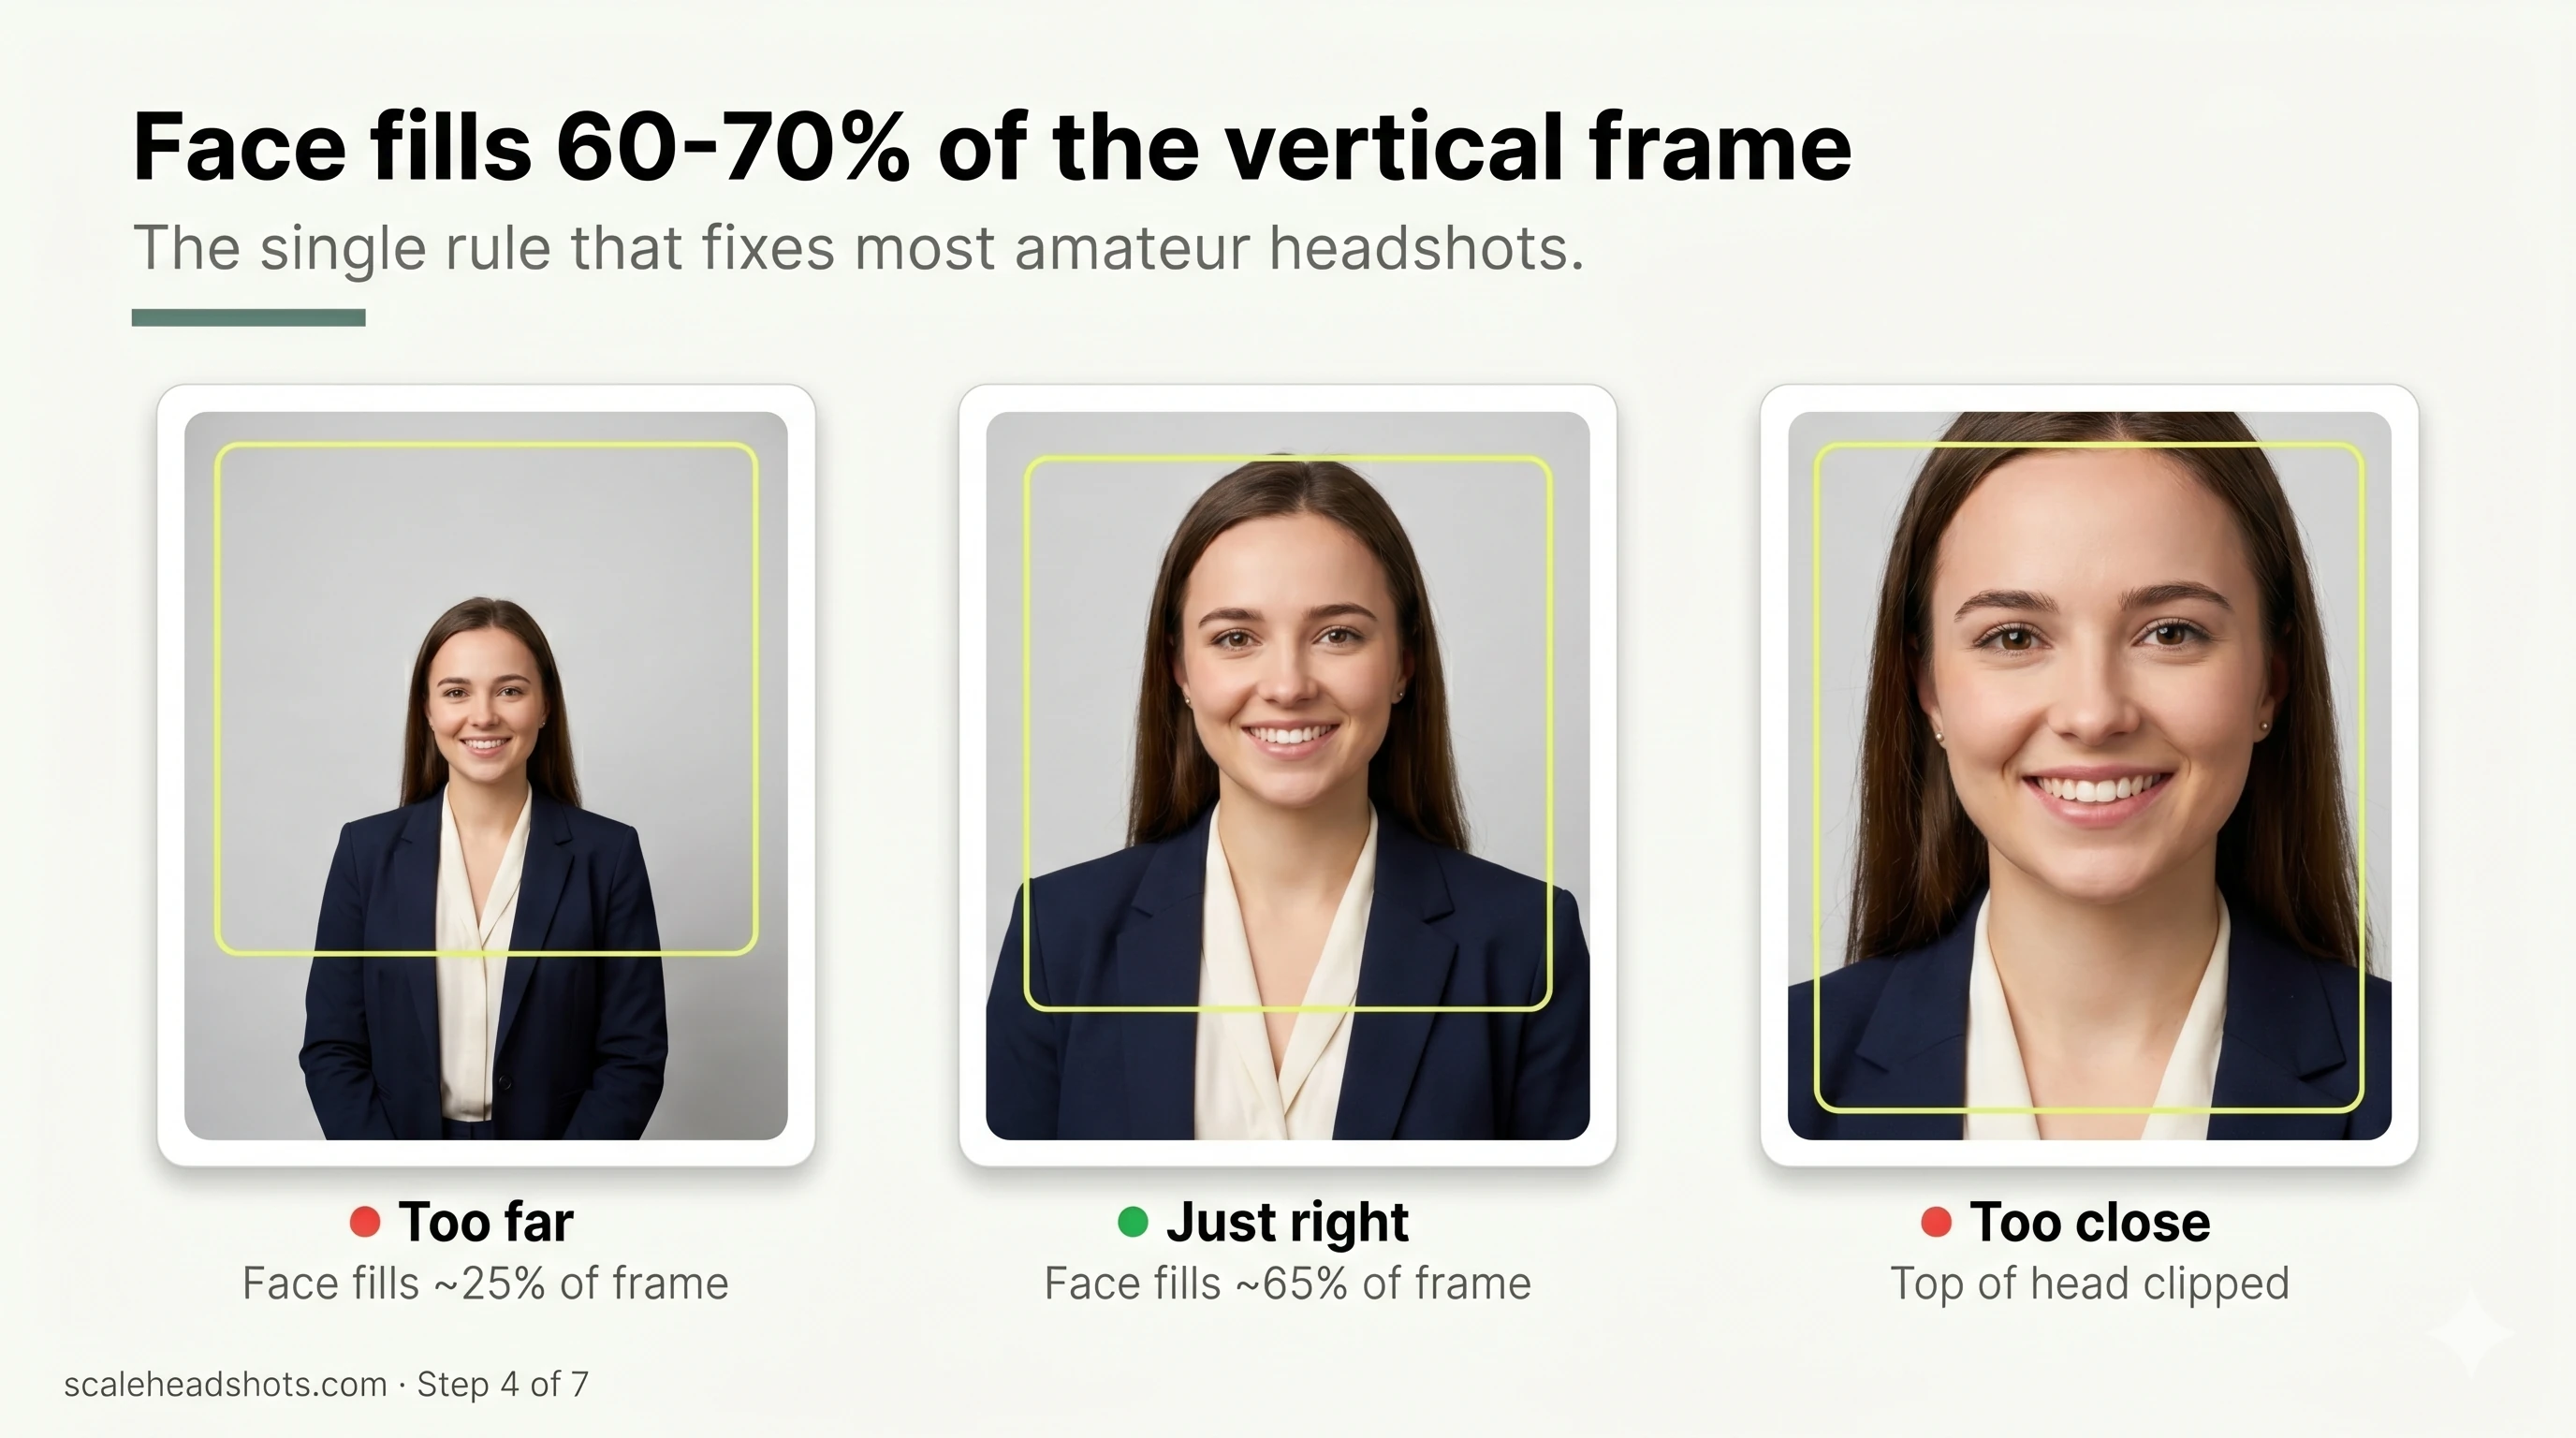
Fill 60 to 70 percent of the frame with your face. Most phone headshots are taken from too far away, which leaves your face small and the background dominant. Get close enough (or crop afterward) so your face fills roughly two-thirds of the vertical frame, with a little headroom above your hair and the crop landing around your upper shoulders. Use the gridlines to put your eyes along the upper third line.
Step 5: Angle your body, not just your face
Standing square to the camera reads as flat or confrontational. The fix is to turn your body slightly and bring your face back to the lens.
Angle your shoulders about 30 to 45 degrees away from the phone, then turn your head back to look straight into the lens. This creates depth and a more natural, dynamic line. Drop your shoulders so they're relaxed rather than tensed up by your ears. Push your chin slightly forward and down (it feels strange, but it sharpens the jawline and prevents a double chin). Add a small forward lean, an inch or two toward the camera, to project engagement.
For expression, look into the lens, not at the screen, and think of something that earns a genuine, relaxed smile or a calm, confident set to the face. A real micro-expression beats a held, frozen grin every time. If you want a deeper reference on what to do with your body and face, our headshot poses guide breaks down the options by role.
Step 6: Take 20 photos, not 2
Professionals shoot dozens of frames to land one keeper, and so should you. Your expression, your eyes, and tiny shifts in your head position change frame to frame in ways you can't feel in the moment but can see clearly afterward.
Set the timer or use a remote shutter and take 20 or more shots across a few small variations: a slightly bigger smile, a more neutral look, a touch more head tilt, a small change in where you're looking. Between frames, reset your posture and take a breath; the relaxed frames almost always beat the posed ones. Then review them large, not on the camera roll thumbnail, and pick the two or three that feel most like you on a good day.
Step 7: Edit with restraint, or skip the editing entirely
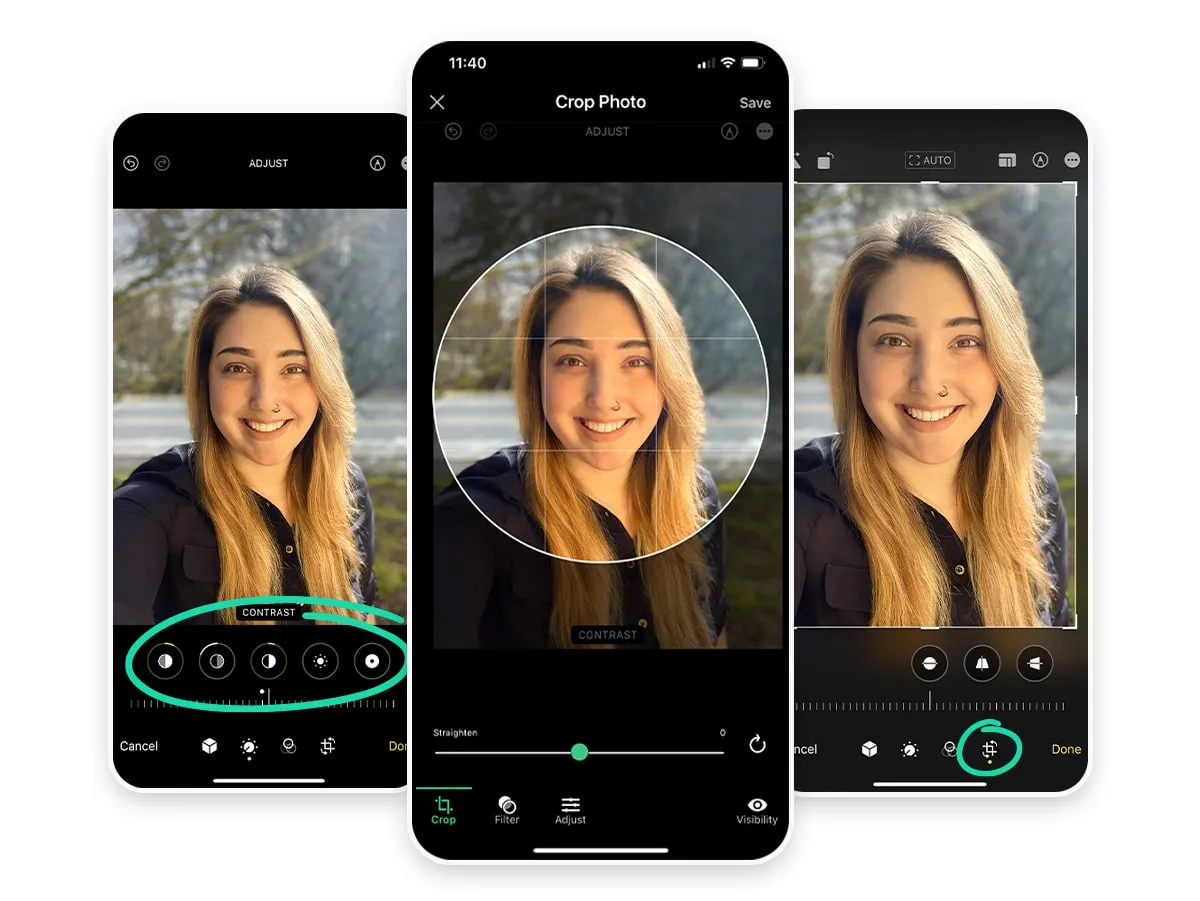
A light edit finishes the photo; a heavy edit ruins it. In the Photos app, you can straighten and crop to your final framing, nudge exposure and contrast so your face is bright and clean, and adjust the temperature and tint if the color skews warm or cool. That's most of what a good edit needs.
Resist the heavy stuff. Skin smoothing, face-slimming, and aggressive filters all push you toward looking artificial, and they read as dated in 2026, where natural skin texture and minimal retouching are the standard. The goal is the best real version of you, not a different person.
If editing isn't your thing, the next section is the shortcut: you can hand the raw photo to a platform that does the finishing for you, consistently, at every size you need.
Capture once, get every format you need
Here's where the iPhone capture becomes more than a one-off photo. The shot you just took is exactly the input our platform is built around. Upload it, and Scale handles the finishing: it cleans up and replaces the background, balances the lighting, corrects color, and upscales the image, then outputs it in every format you actually use. Square for LinkedIn, a transparent PNG for badges and directories, a signature crop for email, full resolution for a website.
This is AI edited, not generated. We work with the real photo of you that you captured on your phone. We don't fabricate a face from a selfie, swap your shirt for a suit that was never there, or invent a person who doesn't exist. You dress up like you want to dress up, you take the photo, and the enhancement improves the photo without changing who's in it. That's the difference between Scale and AI headshot generators, which create entirely synthetic images that often drift from how you actually look.
It also solves the team problem. When 40 people each capture a headshot on their own phone, in their own home office, in five different countries, you get 40 mismatched photos. Run them through the same platform and they come back as one visually consistent set, no flying in a photographer, no aligning everyone's calendars. See how the finishing works on our features page, or check pricing for the per-credit cost (you get three free credits to start).

Is an iPhone headshot good enough for LinkedIn or work?
Yes, for almost everyone. The use cases your headshot actually lives in (a LinkedIn profile, an email signature, a company directory, a conference badge, maybe a website bio) all display your photo small. None of them demand a magazine cover. A well-lit, well-framed iPhone capture clears that bar easily.
Where a phone capture can fall short is consistency across a team and the finishing work (background, color, sizing) that makes a set of photos look like they belong together. That's a process problem, not a camera problem, and it's solvable without hiring a photographer. For the full step-by-step on capturing and uploading a LinkedIn-ready photo, see our LinkedIn headshot guide.
Front camera or rear camera: which takes a better headshot?
The rear camera, every time. It has a larger sensor, higher resolution, and better optics than the front-facing selfie camera, so it captures more detail and more accurate color, which matters most in the soft indoor light you'll use for a headshot.
The selfie camera's only real advantage is that you can see yourself while you shoot. You give that up with the rear camera, but you get it back by propping the phone at eye level and firing with the timer, the volume button, or an Apple Watch. The small extra effort is worth it for the jump in quality.
Frequently Asked Questions
Can you take a professional headshot with an iPhone?
Yes. A recent iPhone has the sensor, lens, and Portrait mode to produce a headshot that reads as professional. The phone is rarely the limitation. Control the light (soft, in front of you), the framing (face filling 60 to 70 percent of the frame at eye level), and the angle (shoulders turned 30 to 45 degrees, face to the lens), and take 20 shots to get one keeper.
Which iPhone camera is better for headshots, front or rear?
The rear camera. It has a bigger sensor, more megapixels, and better lenses than the front-facing selfie camera, so it captures more detail and truer color. Prop the phone at eye level and use the timer or a volume-button or Apple Watch shutter so you can shoot with the rear camera without touching the phone.
Should I use Portrait mode for a headshot?
Yes. Portrait mode blurs the background into a soft, professional falloff that keeps attention on your face. Stand a few feet in front of your background so the blur has room to work. If your iPhone supports it, you can also adjust the blur depth after the shot in the Photos app.
What's the best lighting for an iPhone headshot?
Soft, even light coming from in front of you. The easiest source is a large window at or just above eye level; an overcast day outdoors is even better, because clouds act like a giant softbox. Avoid direct overhead light (it shadows the eyes), direct sun (it causes squinting and harsh contrast), and a bright window behind you (it silhouettes your face).
How far should the phone be from my face?
Close enough that your face fills about 60 to 70 percent of the vertical frame, with a little headroom above your hair and the crop landing around your upper shoulders. If getting that close distorts your features, step back slightly and crop in afterward. Always shoot at eye level, never from below.
Can I use an iPhone headshot for LinkedIn or my work profile?
Yes. LinkedIn profiles, email signatures, company directories, and conference badges all display your headshot at a small size, so a well-lit, well-framed iPhone capture is more than good enough. The harder part is making a whole team's photos look consistent, which is a finishing-and-process problem you can solve with an enhancement platform rather than a photographer.
Can I clean up the background and lighting after I take the photo?
Yes. You can do light edits (crop, exposure, color) yourself in the Photos app, or upload the photo to an enhancement platform that replaces the background, balances the lighting, upscales the image, and outputs every format you need. This is AI edited, not generated: it improves the real photo of you without inventing a synthetic face or changing what you're wearing.
Still have questions? Get in touch and we'll be happy to help!
One photo, every format you need
Take the shot on your iPhone, then upload it. Scale finishes it with a clean background, balanced light, and every output format you use: square for LinkedIn, transparent PNG for badges, signature crop for email. Real photo of you, AI edited, not generated. Start free with three credits.