Tips
How to Take a Professional LinkedIn Headshot: Step-by-Step Guide for 2026
A LinkedIn-ready headshot does not require a professional photographer or a synthetic AI generator. With your phone, the right setup, and seven repeatable steps, you can capture a profile photo that recruiters and clients actually click on.
Your LinkedIn profile photo is the most-viewed image of your professional life. Profiles with a quality headshot get 14x more profile views and 36x more messages from recruiters, according to LinkedIn's own talent data. Yet most professionals settle for a cropped wedding photo, a backlit selfie, or no photo at all.
You don't need a photographer. You don't need a synthetic AI generator. With your phone, ten minutes, and the seven steps below, you can capture a LinkedIn headshot that holds up at every size, from a recruiter's search result down to your email signature.
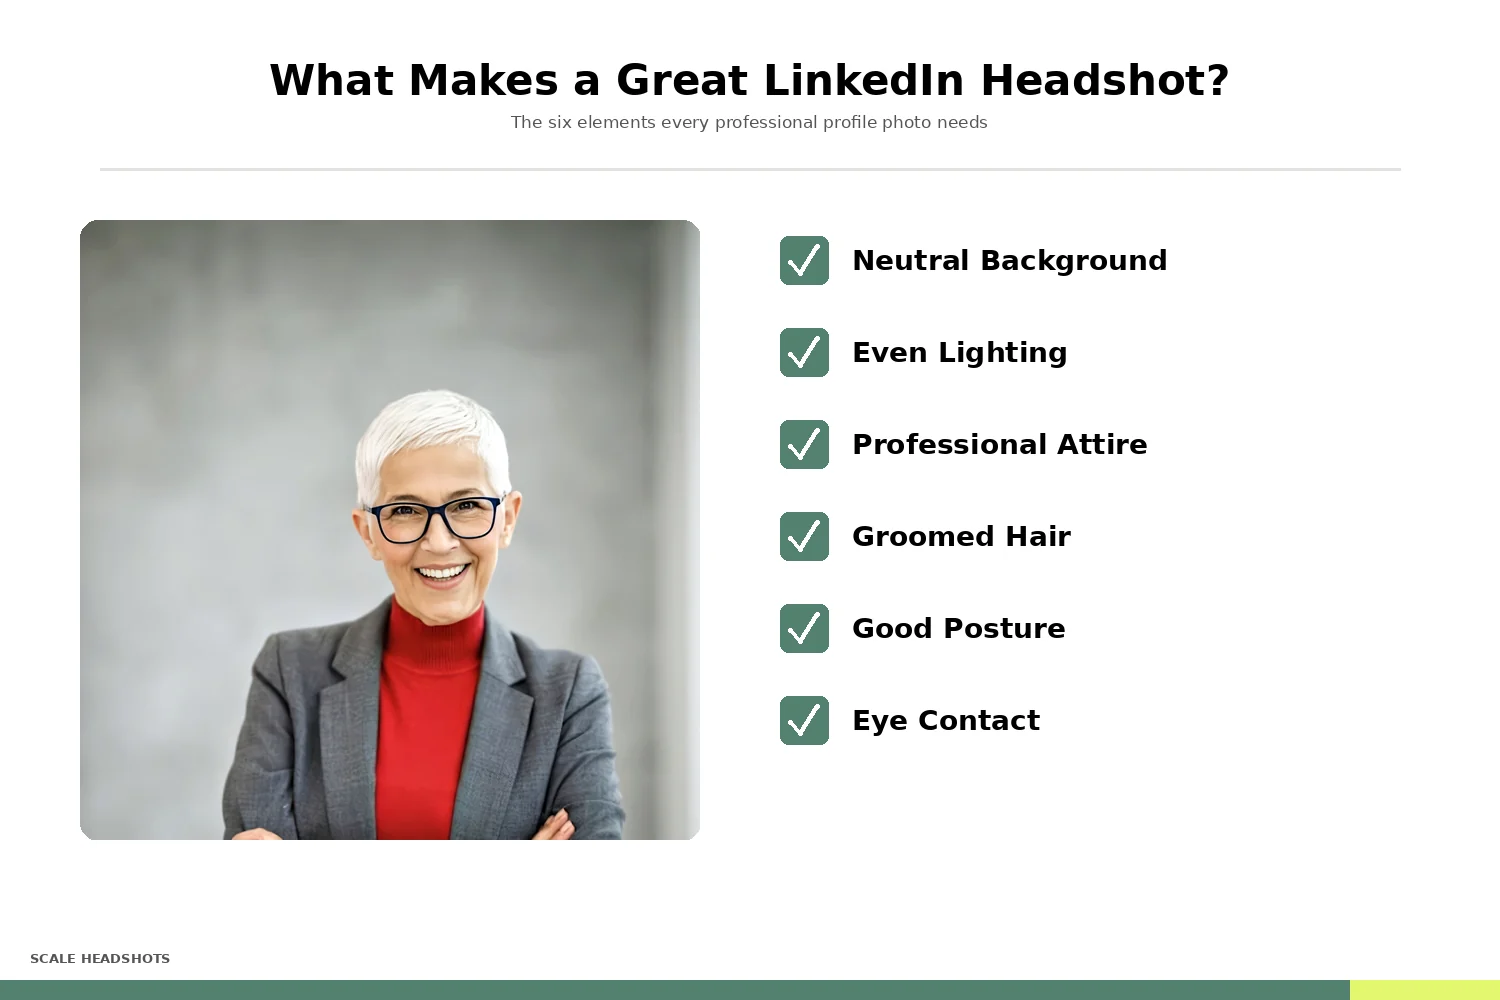
What makes a great LinkedIn headshot?
A clean, sharp head-and-shoulders photo with even lighting, a neutral background, direct eye contact, and a natural smile. Your face fills about 60 to 70 percent of the frame, you're wearing something solid that fits your industry, and you refresh it every couple of years to stay current.
The three jobs your headshot has to do
A good LinkedIn headshot does three things at once. It reads clearly at thumbnail size. It signals your professional category in under a second. And it shows enough of your face for someone to recognize you when they meet you in person.
That last one's where most DIY attempts fall apart. Photos taken in flattering Instagram light, edited to remove every imperfection, or generated entirely by AI all share the same problem. They don't look like the person who shows up to the meeting. LinkedIn runs on professional trust, and trust starts with the photo matching the person.
So the framework for everything below: capture a real photo of you with good fundamentals, and let the editing process enhance rather than transform.
Step 1: Choose a clean, neutral background
LinkedIn crops profile photos into a circle. That means every pixel outside your head and shoulders is competing for attention. Busy backgrounds (bookshelves, kitchens, conference rooms with people moving in the background) all pull the viewer's eye away from your face.
Neutral tones consistently win. White, light gray, soft blue. A plain wall works. A blurred office hallway works. The corner of any room where you can stand 4 to 6 feet away from the wall behind you works.
If your space isn't ideal, frame the shot anyway. Background cleanup is the easiest part of the editing pipeline, so the bigger payoff is getting the rest right while you've got the light and the time.
Step 2: Dress for the role you want
Wear what you'd wear to a meaningful work meeting. If your day-to-day is jeans and a button-down, that's a more honest signal than a suit you only own for weddings. If your day-to-day is a suit, wear it.
A few patterns that hold up across industries:
Solid colors photograph better than patterns. Stripes and small repeating prints can introduce moire artifacts at thumbnail size.
Skip pure white shirts in bright light (they blow out and steal attention from your face). Off-white, pale blue, gray, and navy all hold detail.
Avoid logos larger than a coin. They look like advertising in a portrait context.
Skip the loud accessories. The viewer should see your face first, your clothing second.
Different industry, different rules
Lawyers, executives, doctors, realtors, and creatives all dress a little differently for their headshots. We've got specific guides for each one with common mistakes, what reads as confident, and what to avoid in 2026.
See the industry guidesStep 3: Set up your lighting (the single biggest factor)
Lighting matters more than the camera, the outfit, or the pose. A great photo in bad light still looks bad. A passable photo in good light looks great.
The simplest setup that works: stand facing a window with indirect daylight. Not direct sun (that creates harsh shadows on one side of your face), not the window behind you (you become a silhouette), but the window roughly perpendicular to your line of sight or just slightly off-center.
A few things to avoid:
Overhead fluorescent or recessed ceiling lights, which create dark circles under your eyes.
Mixed light sources (a warm lamp on one side, cool window light on the other), which produce a color cast that's hard to fix in editing.
Shooting at midday outdoors with direct sun overhead.
If natural light isn't available, a single soft light source roughly 45 degrees off your shooting axis (a ring light, a desk lamp with a diffuser, even a bright laptop screen) will outperform overhead lighting every time.
Step 4: Frame the shot (the 60-70 percent face fill rule)
LinkedIn's circular crop sits inside a square thumbnail that displays at roughly 200 by 200 pixels on a recruiter's search page. At that size, anything more than three feet of background is wasted space.
The rule that works: compose a head-and-shoulders shot where your face fills 60 to 70 percent of the vertical frame, with the top of your head about an inch below the top edge and your shoulders cropped at the lower third.
A few framing checks before you shoot:
Camera at eye level or slightly above. Below eye level looks up your nose. Above eye level adds approachability.
Phone in landscape orientation, not portrait. Crop to square later. Landscape gives you more pixels to work with on the editing pass.
Leave a small margin around your head. LinkedIn's circular crop trims more aggressively than you'd expect.
You can preview the circular crop by capturing the photo, opening LinkedIn on your phone, and using the profile photo upload flow's preview screen before you commit.

Step 5: Nail your pose and expression
Direct eye contact, natural smile, slightly angled body. That's the entire pose.
A few specifics that consistently outperform the alternatives:
Eyes into the lens. Profiles where the subject looks directly into the camera outperform angled or averted-gaze shots. Direct eye contact signals confidence and competence in a way a side glance doesn't.
Body angled 15 to 30 degrees off the camera. A straight-on, shoulders-square stance reads as a mug shot. A small body angle with the head turned back toward the camera reads as natural and confident.
Natural slight smile. Not a forced grin (it shows in the eyes and the cheek tension). Not a closed-mouth neutral (it reads as guarded). Think of a moment a colleague said something funny five seconds ago and you're still in the after-glow.
For more pose options with industry-specific recommendations, see our pose reference guide.

Step 6: Take 10 or more photos, not 2
The single biggest mistake DIY headshots make: stopping after one or two photos. Every professional photographer takes hundreds of frames to deliver three or four finals. You should do the same, scaled down.
A practical capture session:
Have someone else hold the phone. The rear camera is significantly higher resolution than the selfie camera, and someone else holding it removes the unnatural arm-extended posture.
Take at least 10 photos in your first setup. Same pose, same expression, same light. Subtle differences in your face from frame to frame add up.
Change one thing (head angle, smile intensity, eye direction) and take 10 more.
Switch to a slightly different framing (closer crop, further back) and take 10 more.
Review on a larger screen than your phone. Faces look different on a phone than they will at thumbnail size on a recruiter's monitor.
Thirty photos in three configurations gives you a real selection. Two photos gives you a coin flip.

Step 7: Edit with restraint (or skip the editing entirely)
Good editing is invisible. Bad editing makes your photo look like a stock image. The professional standard sits in the middle: cleaned-up skin texture, balanced lighting across both sides of the face, a clean background, and color correction that matches reality.
Manual editing options if you want to do this yourself: adjust exposure to balance the photo, raise shadows slightly to recover under-eye detail, reduce highlights if the bright side of your face is blown out, and lightly sharpen the eyes. Skip the skin-smoothing filters that erase texture entirely (they read as fake at any size).
The alternative is to skip the editing entirely. A headshot enhancement platform takes your captured photo and applies professional-grade enhancement without changing what you look like. AI edited, not generated. The output is your face, your features, your expression, just with the production quality of a studio shot. One photo, every format you actually use: LinkedIn square, email signature, badge photo, website headshot.
How often should you update your LinkedIn headshot?
Every two to three years is the working rule, or whenever your appearance changes meaningfully (new hairstyle, significant weight change, glasses, beard).
Two reasons updating matters more than people realize:
Recognition. If your photo's five years old and you meet a recruiter at a conference, they won't recognize you. The headshot's job is to match the person who shows up to the meeting.
Algorithmic visibility. LinkedIn treats profile updates as engagement signals. Updating your photo (along with any job status changes) temporarily boosts your visibility in search results and feeds. Professionals who update their photo alongside a job change see up to 3x higher network engagement in the following weeks.
A useful cadence: set a calendar reminder for every 24 months, or update whenever you change jobs.
Do you actually need a professional photographer?
For most professionals, no. A photographer's the right call when the photo's a brand asset for a public-facing role (executive bio on a Fortune 500 site, book jacket, speaking engagement marketing). For everything else, the cost-benefit favors a DIY capture with the right setup.
A rough comparison of the three paths most professionals consider:
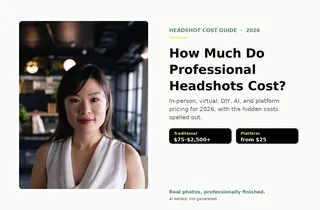
Traditional photography. $150 to $500 per session, scheduled in advance, takes a half-day, requires travel, delivers 2-5 finals after a 1-2 week turnaround.
AI-generated headshot tools. $29 to $49, instant turnaround, but the output's a synthetic image trained on photos of you. Not a real photo. The likeness drifts, the photo can't be used in any context where authenticity matters, and recent AI fatigue means recruiters increasingly clock the generated look.
Real photo plus AI-enhanced quality. Capture on your phone in ten minutes, upload to an enhancement platform, get a production-quality headshot in minutes. You stay yourself; the enhancement handles the lighting, background, and quality. Pricing starts at $25 per finished headshot, with retakes included.
Shortest version: a real photo of you, lit well, beats a generated photo every time. The enhancement layer makes the difference between 'photo I took on my phone' and 'photo that looks like it cost three hundred dollars.'
Frequently Asked Questions
What size should a LinkedIn headshot be?
LinkedIn's recommended profile photo size is 400 by 400 pixels minimum, square aspect ratio. The platform accepts files up to 8MB in JPG or PNG. For the best display across desktop and mobile, upload at 1000 by 1000 pixels or higher and let LinkedIn handle the downscaling.
Can I take a professional LinkedIn headshot with my phone?
Yes. Modern smartphone cameras (any iPhone or Android flagship from the last four years) capture more than enough resolution and dynamic range for a professional-quality LinkedIn headshot. The bigger variables are lighting, framing, and pose, not the camera.
What's the best background color for a LinkedIn headshot?
Neutral tones in white, light gray, or soft blue consistently outperform busy or environmental backgrounds. A plain wall, a blurred office hallway, or any solid color that contrasts with your skin tone and clothing will work.
Should I smile in my LinkedIn photo?
Yes, a natural slight smile. Studies of LinkedIn profile performance consistently show that subtly smiling headshots receive more profile views and message responses than neutral or unsmiling photos. The key word is 'natural'; a forced grin reads as inauthentic and underperforms a relaxed neutral expression.
How often should I update my LinkedIn headshot?
Every two to three years, or whenever your appearance changes meaningfully. Updating your headshot also triggers a profile-update notification to your network, which LinkedIn treats as an engagement signal and temporarily boosts your visibility in search results.
How is an AI-enhanced headshot different from an AI-generated one?
An AI-enhanced headshot starts with a real photo of you and applies enhancement (lighting balance, background cleanup, color correction, sharpening) without changing your appearance. AI edited, not generated. An AI-generated headshot creates an entirely synthetic image trained on photos of you. The first preserves authenticity; the second often produces results that look right but drift from your actual appearance.
What outfit should I wear for a LinkedIn headshot?
Wear what you'd wear to a meaningful work meeting in your industry. Solid colors photograph better than patterns. Skip pure white shirts in bright light, large logos, and loud accessories. The viewer should see your face first and your clothing second.
Still have questions? Get in touch and we'll be happy to help!
One photo, every format you need
Upload a single phone photo. Get a LinkedIn-ready square, an email signature crop, a clean background variant, and a transparent PNG for badges and slides. Start free with three credits.