
Tips
How to Take a Professional Headshot at Home: 7 Steps for 2026
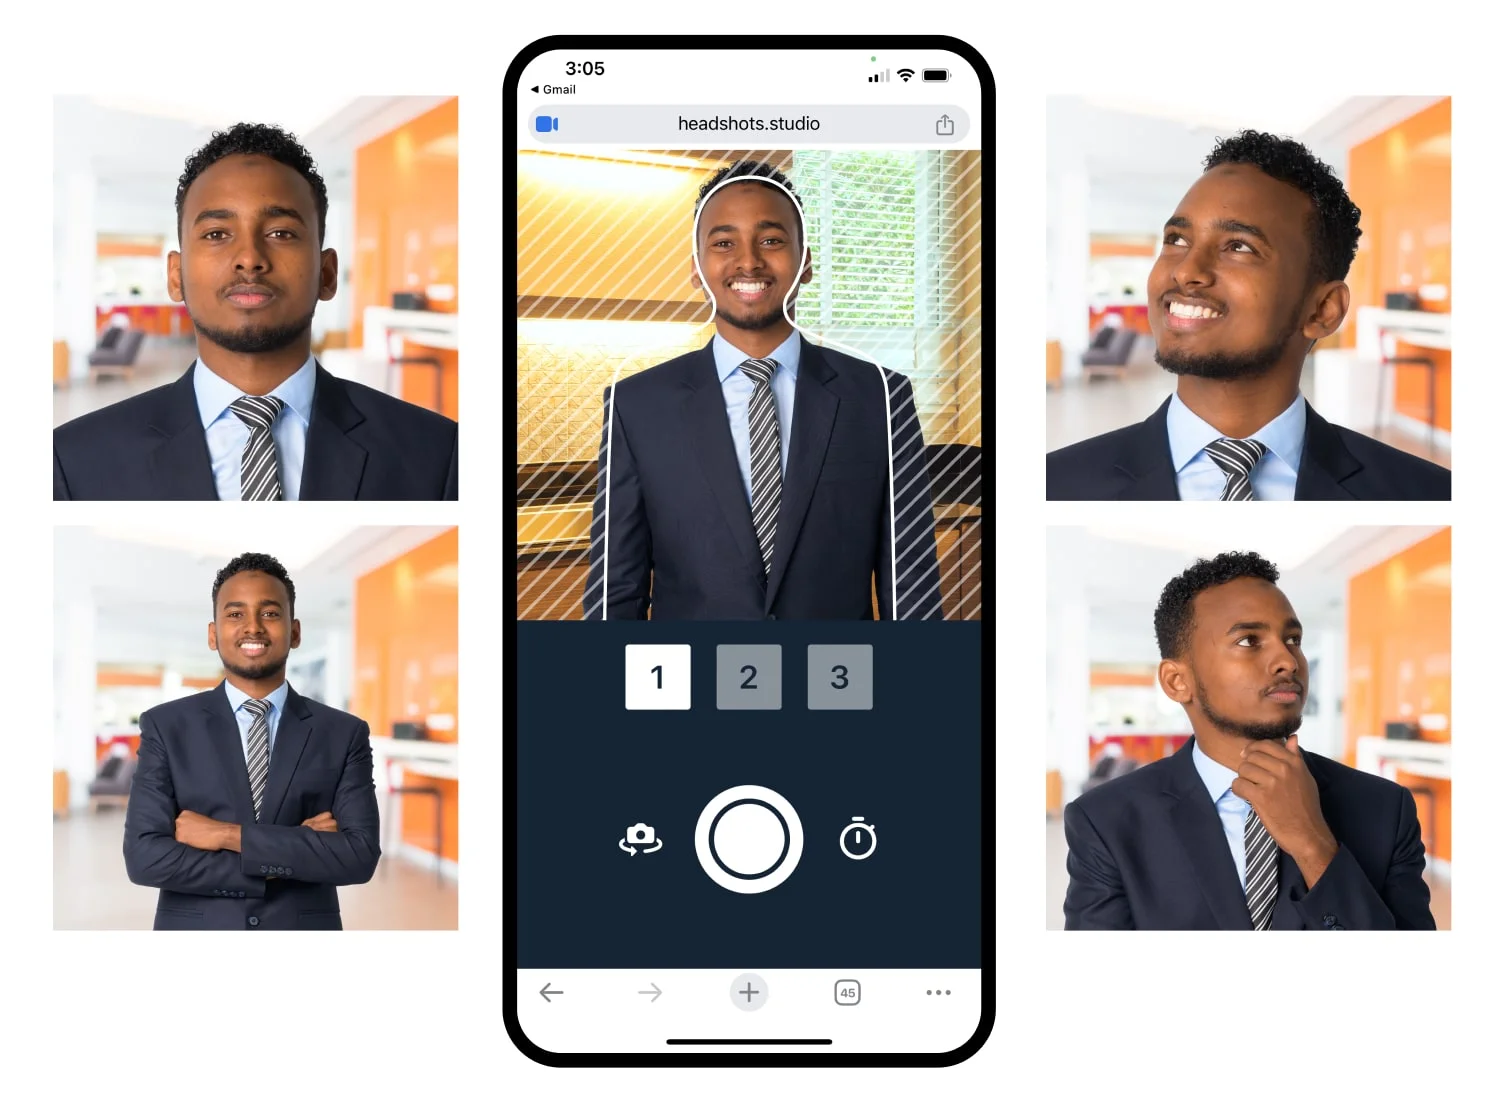
You don't need a photographer or a studio. With your phone, the right setup, and seven repeatable steps, you can capture a professional headshot at home that holds up everywhere you use it.

Your headshot is the first thing prospects, clients, and recruiters see before they meet you. It's on your LinkedIn profile. It's at the top of your email. It's in your company's About page, on Slack, in conference programs, in your Zoom waiting-room tile. The cumulative reach of a single headshot is bigger than most people realize, and the gap between "looks like a pro" and "looks like a phone selfie" is mostly a matter of setup, not budget.
The good news: any iPhone or Android flagship from the last four years captures plenty of resolution. Phone hardware stopped being the bottleneck about five years ago. What still matters is light, background, framing, and a real plan for how the photo gets edited afterward.
You don't need a photographer. You don't need a synthetic AI tool that fabricates a face. With the seven steps below, you can capture a real photo at home and end up with a polished, brand-safe headshot in every format you need.
What does it take to get a professional headshot at home?
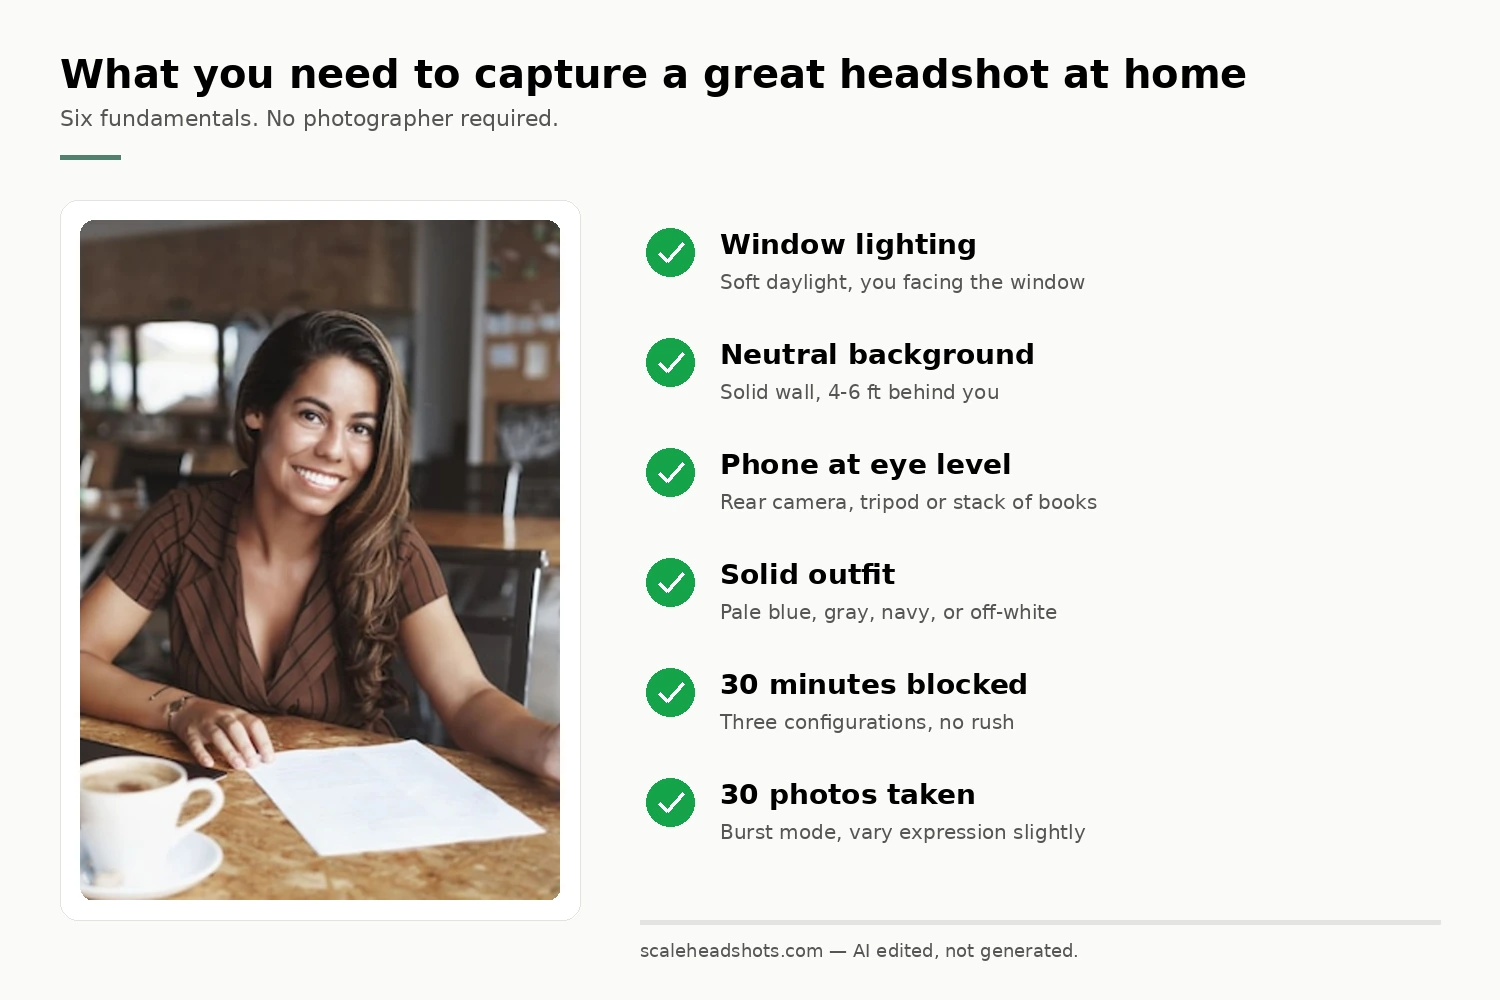
A clean head-and-shoulders photo taken in soft daylight, against a neutral background, with your phone positioned at eye level about four to six feet away. Your face fills 60 to 70 percent of the frame. You take 30 photos across three setups, pick the best one, and either edit it lightly or upload it to a platform that handles the enhancement for you.
The three jobs a DIY headshot has to do
A good DIY headshot does three things at once. It reads at thumbnail size, because most people see it as a 200-pixel circle on a phone. It signals your professional category in under a second, so the viewer recognizes the role without reading any text. And it shows enough of your real face that a stranger could pick you out of a lineup at an event.
Most home setups fail on the first two. The lighting is uneven, or the background is busy, or the phone is too close, and the thumbnail reads as cluttered. The fix is rarely a better camera. It's a window, a clean wall, and a few minutes of attention to framing.
We wrote this guide for the case where you want a headshot you can use today, captured at home, with what you already have. Capture a real photo with good fundamentals, and the editing process can do the rest.
Step 1: Find your window (the best free light source you have)
Lighting matters more than the camera, the outfit, or the pose. A great photo in bad light still looks bad. A passable photo in good light looks great.
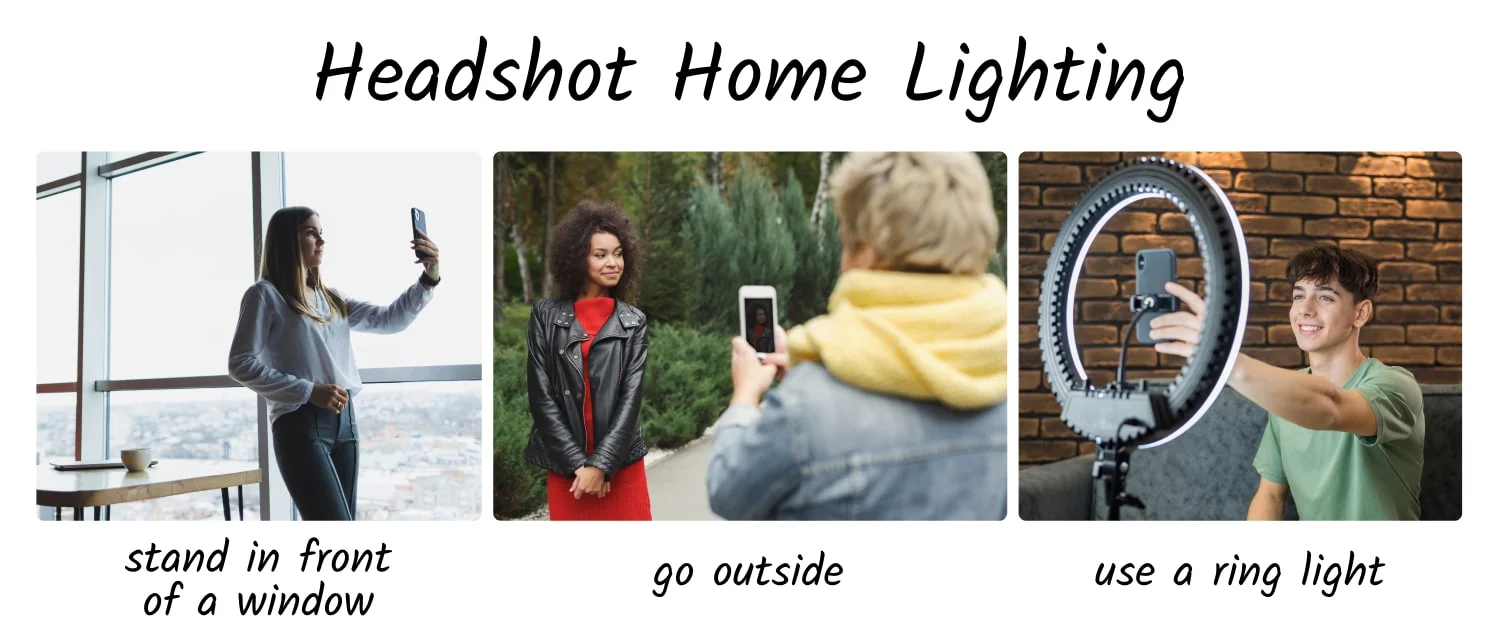
The cleanest light most people have access to is a large window on an overcast day. Position yourself facing the window directly, with your phone between you and the window. Soft, indirect daylight is the most flattering light most people will ever shoot in, and it costs nothing.
Avoid four common lighting traps. Overhead recessed lights cast shadows under your eyes and chin that are hard to fix later. Mixed sources (a window plus a warm lamp plus a ceiling light) create color casts on different parts of your face. Direct midday sun blows out highlights and squints your eyes. Backlighting (a window behind you) turns your face into a silhouette.
If a good window isn't available, a single soft light source positioned 45 degrees off your shooting axis is the next best thing. A ring light works. A daylight-balanced LED panel works. Even a desk lamp with a sheet of white paper diffusing it is better than overhead fluorescents.
Step 2: Set up a clean, neutral background
The viewer's eye should land on your face, not on whatever is behind you. Solid neutral tones in white, light gray, soft blue, or beige consistently outperform busy or environmental backgrounds.
The easiest setup: stand four to six feet in front of an empty wall in a quiet room. The distance matters. If your back is against the wall, you'll cast shadows onto it and pick up any wall texture in sharp focus. Stepping forward lets the wall blur softly behind you and gives any minor scuffs a chance to disappear.
Avoid bookshelves, kitchens, plants, art, and anything color-saturated. They draw the eye away from your face at thumbnail size. If your only available wall has texture or color you don't love, Scale can swap the background to a clean studio-style neutral after capture. (See more background options.)
Step 3: Position your phone (height and distance matter more than the camera)
Use the rear camera, not the front-facing one. The rear camera has higher resolution and better dynamic range. Selfies look like selfies even when the photo is well-composed, partly because the lens itself is a giveaway and partly because arm's-length distance creates lens distortion that exaggerates your nose and forehead.
Set your phone at eye level or very slightly above. Below eye level looks up your nose. Far above eye level shrinks your face. A simple tripod works. So does a stack of books on a desk. So does a music stand. Anything that holds the phone steady at the right height.
Distance matters as much as height. Position the camera four to six feet away from where you'll stand, then use the camera's lens zoom (not digital zoom) to fill the frame. Standing too close and shooting wide creates the same distortion as a selfie. Standing back with a tighter lens crop produces the proportions you actually look like in real life.
If your phone has portrait mode, turn it on. The blurred background it creates is usually flattering. Modern phones do this convincingly enough that the result reads as a real photograph and not a software effect.
Step 4: Frame the shot (face fills 60-70 percent of the vertical frame)
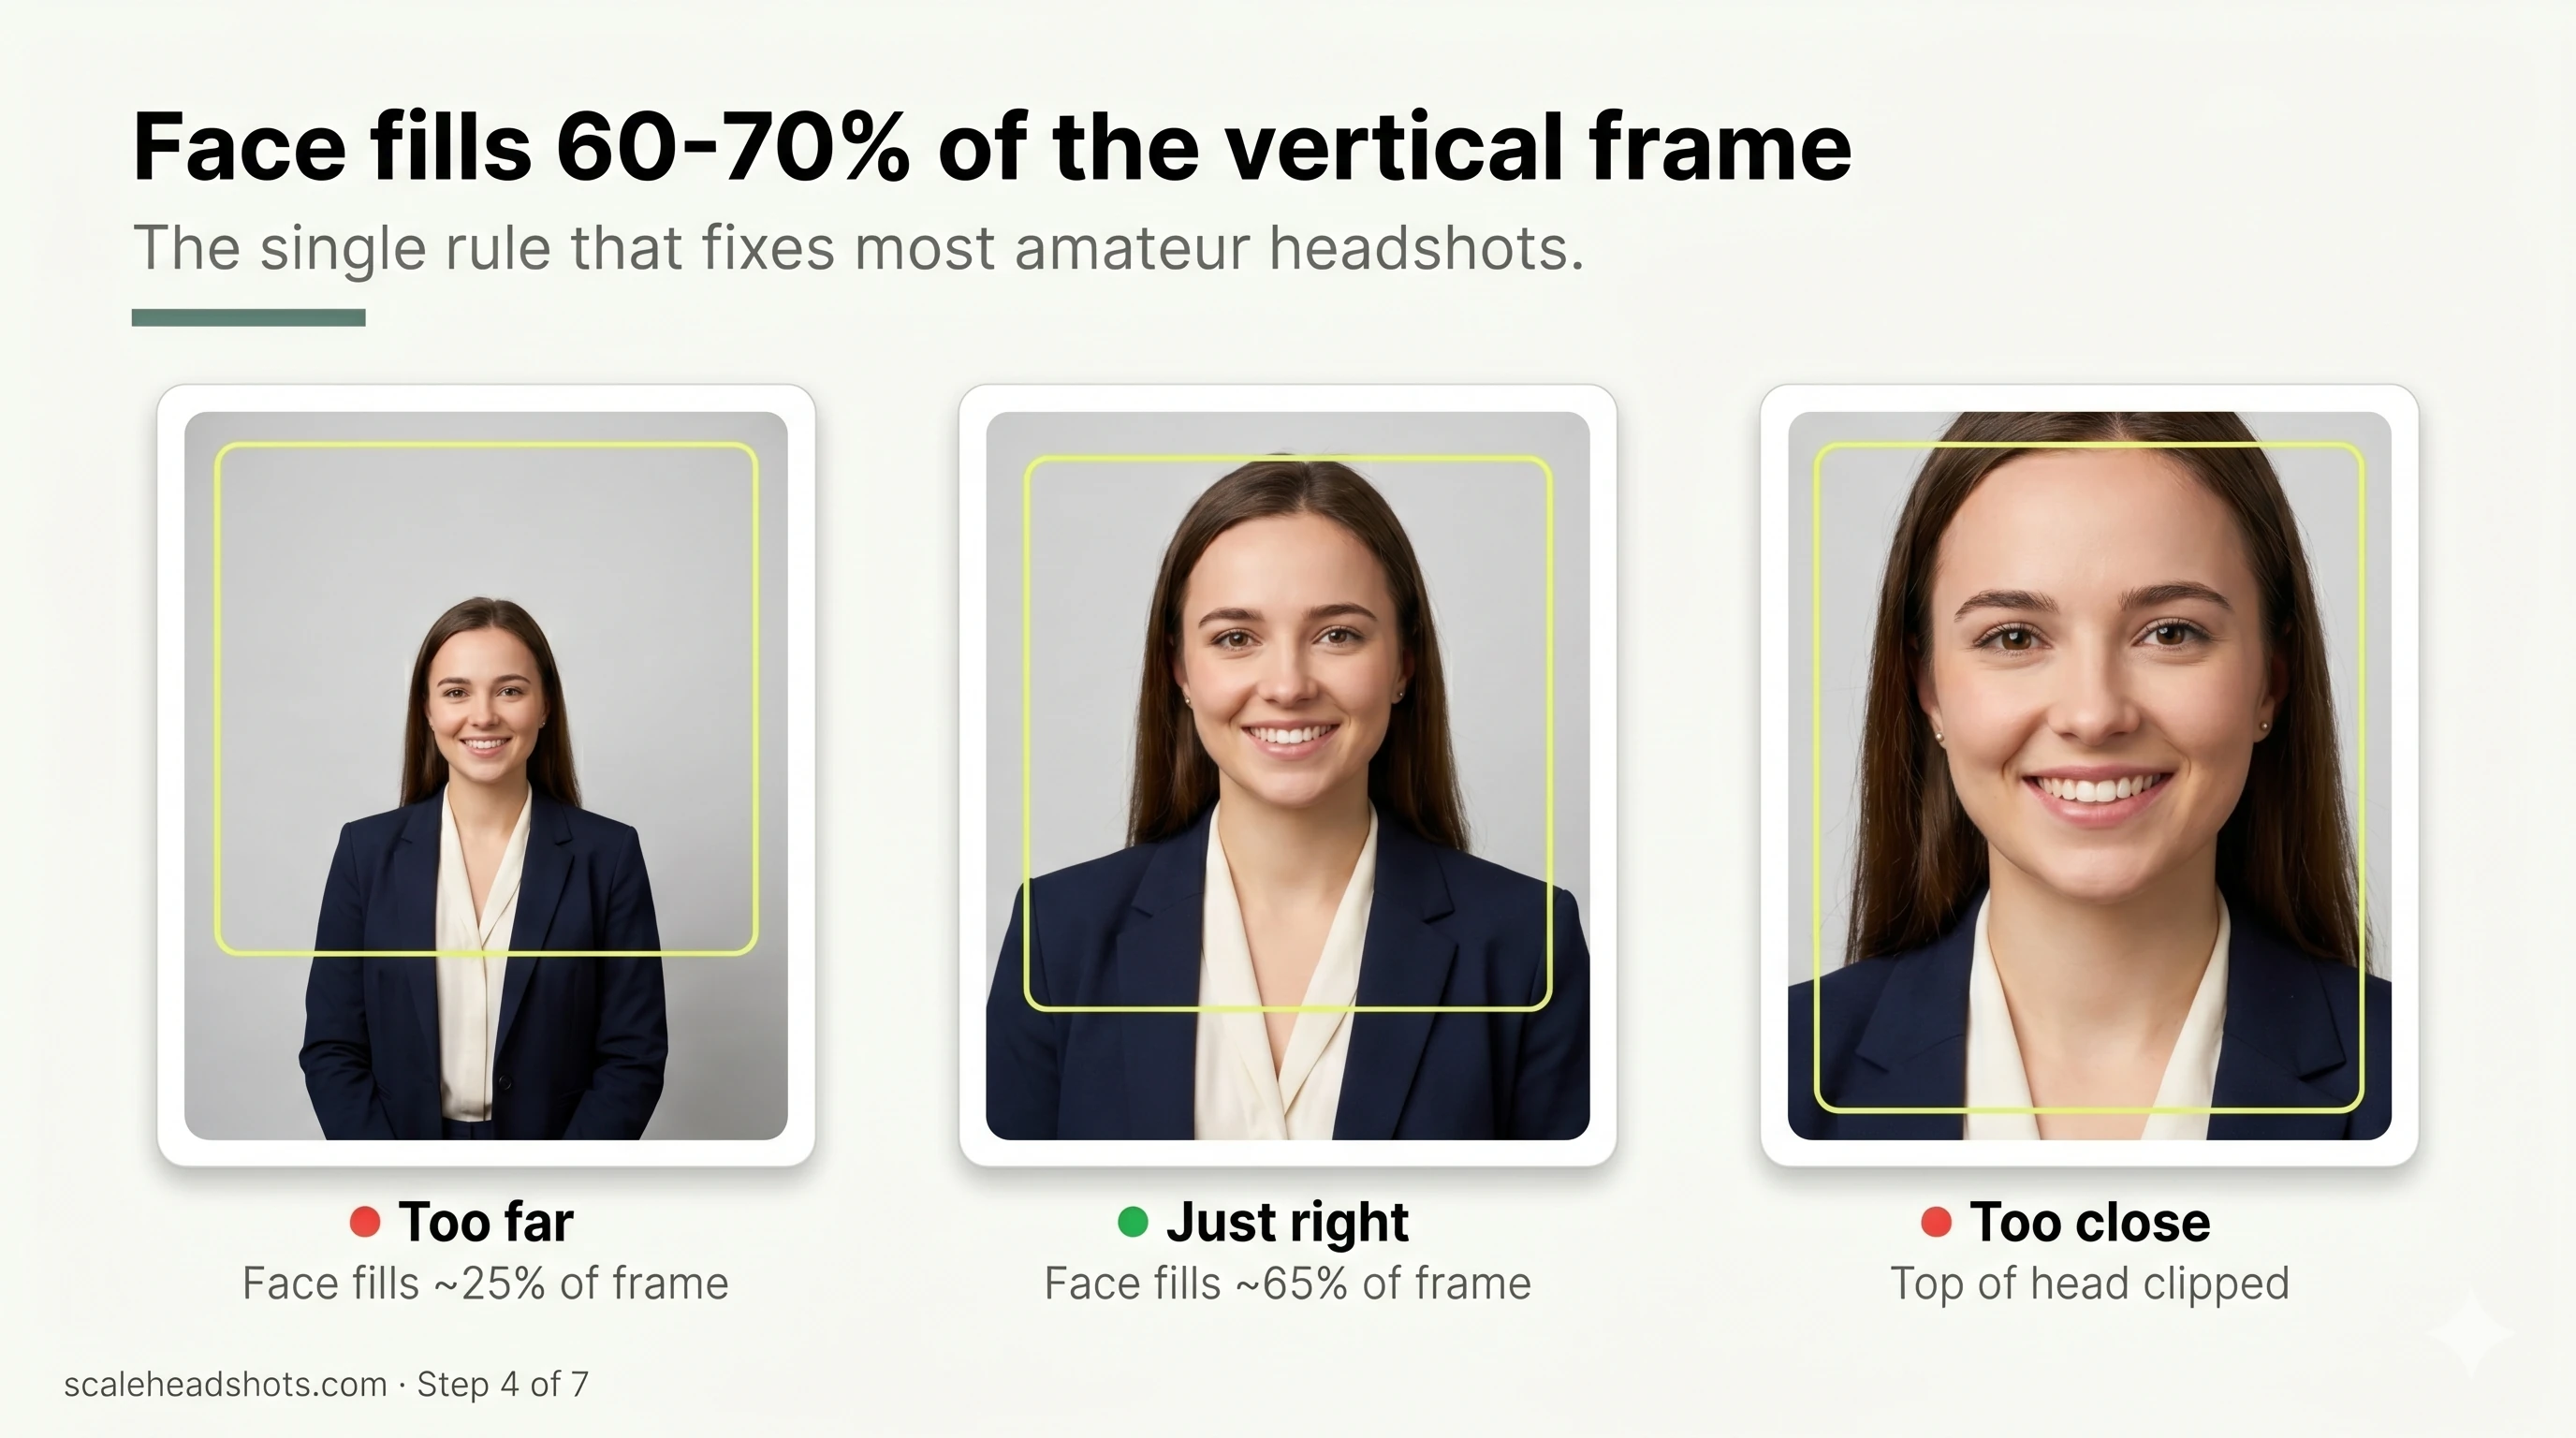
The single rule that fixes most amateur headshots: your face should fill 60 to 70 percent of the vertical frame. Smaller than that and you look lost in a wide composition. Larger than that and the top of your head gets clipped or your forehead dominates.
Top of your head sits about an inch below the top edge. Your shoulders crop somewhere in the lower third. Eye line falls roughly one-third of the way down the frame. This isn't art-school theory. It's the proportion that reads as "professional headshot" on every platform your photo will end up on.
Shoot in landscape orientation, then crop to a square afterward. Landscape gives you room to recompose if your initial framing is slightly off. It also produces the source material for the multiple aspect ratios you'll need: a 1:1 square for LinkedIn and most directories, a 4:5 vertical for some company About pages, a wide horizontal crop for email signatures.
Step 5: Wear what you'd wear to a real meeting
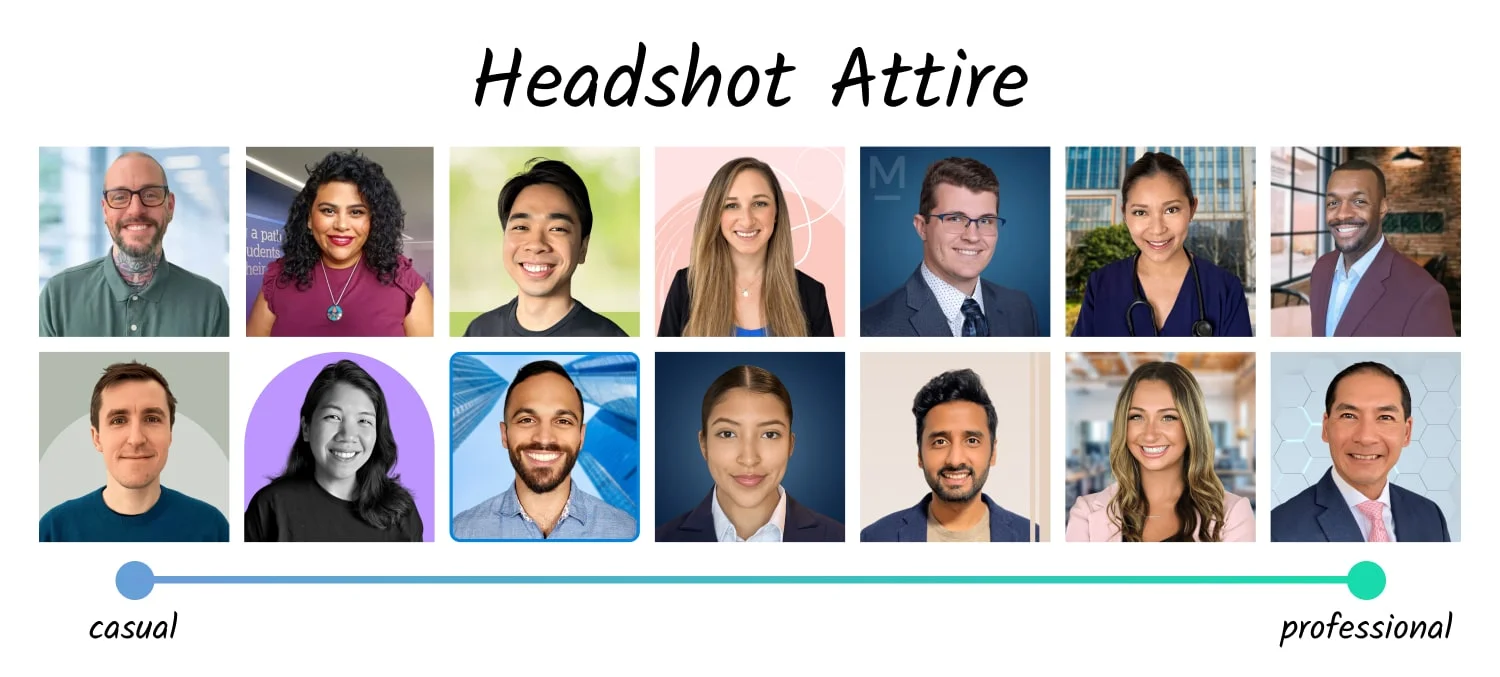
Dress for the meeting you'd actually attend in your role, not for a fantasy version of it. A startup founder doesn't need a suit. A litigator doesn't show up in a hoodie. Match what your peers would wear in the most consequential meeting they'd have that week.
A few rules hold across industries. Solid colors photograph better than patterns. Pure white shirts blow out in bright light and pull the camera's exposure away from your face, so off-white, pale blue, light gray, or navy hold detail better. Logos should be no larger than a coin. Loud accessories compete with your face for attention.
The wardrobe rule scales with the audience. The most useful version of "dress for the role you want" is industry-specific: a lawyer's headshot signals different things than an executive's headshot, even when both are taken in the same living room.
Different industry, different rules
Lawyers, executives, doctors, realtors, and creatives all dress a little differently for their headshots. We've got specific guides for each one with what reads as confident, what to avoid, and what's changed in 2026.
See the industry guidesStep 6: Take 30 photos, not 3 (the by-yourself or with-a-friend trick)
The single biggest mistake DIY headshots make: stopping after one or two photos. Photographers in a real studio shoot 80 to 200 frames per session because expression, eye focus, and timing change in milliseconds. The keeper is rarely the first shot.
Block out 30 minutes and aim for three configurations: a head-and-shoulders shot near the window, a slightly looser crop standing in front of the wall, and a tighter close crop with the phone moved in a foot. Ten photos per setup. Vary your expression and angle slightly between each one. By the end you'll have 30 frames, and three or four will be actually usable.
Capturing solo works if you have to. Set your phone's self-timer to 10 seconds, set it to burst mode, and let it fire 10 frames per timer cycle. You'll need a tripod or a stack of books at the right height. Stand on a marked spot on the floor so your distance stays consistent.
Having someone else hold the phone produces better results faster. You can see your face on the screen, they can adjust framing in real time, and you can sit through the awkward "make a real expression" phase faster when there's another person involved. A friend, a partner, a coworker, even a teenager works.
Step 7: Edit lightly, or skip the editing entirely
Good editing is invisible. Bad editing is the reason most DIY headshots end up looking off-brand: skin smoothed to porcelain, eyes sharpened to artifact, the background color shifted because someone moved a global saturation slider too far.
Four levers cover almost every adjustment a phone headshot actually needs:
Exposure. Brighten or darken the whole image to fix shots that came out too dark or too bright. Most home captures lean slightly underexposed; lifting exposure half a stop usually helps.
Shadows. Raise the shadow slider gently to lift the dark areas under your eyes and chin. Don't push it past 30 percent or the image starts to look flat.
Sharpness. A small sharpen pass on the eyes only is the single biggest-impact edit. Avoid global sharpening, which adds visible noise to skin.
Color. Leave saturation alone unless the white balance is obviously off. The Apple Photos auto-white-balance is usually right; second-guessing it does more harm than good.
Skip the skin-smoothing, the teeth-whitening, the eye-enlarging filters. Those are the edits that make a photo read as "edited." Your face's actual texture is what people see in person.
Or take the photo and skip editing entirely. Upload it to a headshot enhancement platform and the system handles the lighting balance, background cleanup, color correction, and sharpening for you. AI edited, not generated. You stay the person in the photo; the platform handles the polish. Pricing starts at $25 per finished headshot and your first three credits are free.

How often should you update your headshot?
Every two to three years is the working rule, or whenever your appearance changes meaningfully. A new hairstyle, glasses, beard, or significant weight change is enough to retake. So is a new role.
Two things drag down a stale headshot. Recognition: a photo from five years ago means people who meet you in person don't quite map the face to the name. Trust: a visibly dated photo (the wedding crop, the college senior portrait, the conference photo from 2018) reads as careless about your own brand, which is a hard signal to scrub from a first impression.
There's an algorithmic reason to update too. On LinkedIn, swapping your headshot triggers a profile-update notification to your network, which the platform treats as an engagement signal and temporarily boosts your visibility in search. Pair an update with a job change and the visibility lift compounds.
Set a 24-month calendar reminder. Update with major life events. Don't wait for the next conference to force the question.
Do you actually need a professional photographer to get a great headshot?
For most professionals, no. Three paths now produce a publishable headshot, and the gap between them isn't quality. It's cost, control, and how the photo handles the rest of your professional surface area.
Traditional photography runs $150 to $500 per session. You get one to two weeks of turnaround, a studio look, and two to five finals. It's the best path if you want a true studio aesthetic and you don't mind the scheduling. It's the worst path if you need to update headshots across a 50-person team or refresh annually.
AI-generated tools run $29 to $49. You upload selfies, wait an hour or two, and get back synthetic headshots that look like a version of you. The catch is the second word in that sentence. They're not photos. They're trained likenesses, and the authenticity drift (a different jawline, a slightly different smile, a hairline that's not quite yours) is exactly the kind of thing a recruiter or client notices when they meet you in person.
Real photo, AI-enhanced is the third path, and it's the one Scale was built for. You capture a phone photo at home using the seven steps above. We handle the enhancement, the background, the color correction, the upscaling, and the multiple output formats you need (LinkedIn square, transparent PNG for badges, email signature crop, ATS profile, About-page hero). Pricing starts at $25 per finished headshot, retakes included, and your first three credits are on us. The phrase to remember: AI edited, not generated.

Frequently Asked Questions
Can I really take a professional headshot at home with just my phone?
Yes. Any iPhone or Android flagship from the last four years captures enough resolution and dynamic range for a professional-quality headshot. The bigger variables are lighting, framing, and pose, not the camera. Phone hardware stopped being the bottleneck several years ago.
What's the best lighting for a headshot at home?
A large window on an overcast day, with you facing it directly and your phone positioned with the window behind it. Soft, indirect daylight is the most flattering light most people will ever shoot in, and it's free. If the weather isn't cooperating, a single soft light source positioned 45 degrees off your shooting axis works as a substitute.
How do I take a professional headshot by myself, without help?
Use a tripod (or a stack of books) at eye level, set your phone's self-timer to 10 seconds, and shoot in burst mode for each setup. Plan three configurations: a head-and-shoulders shot near the window, a looser standing crop, and a tighter close crop. Stand on a marked spot on the floor so your distance stays consistent. Plan on 30 minutes.
What background should I use for a headshot at home?
A solid, neutral-colored wall in white, light gray, beige, or soft blue. Stand four to six feet in front of it so any wall texture softly blurs behind you. Avoid bookshelves, kitchens, plants, and anything cluttered or color-saturated. If your wall isn't great, a tool like Scale can swap the background after capture.
What should I wear for a headshot at home?
Wear what you'd wear to a meaningful work meeting in your industry. Solid colors photograph better than patterns. Skip pure white shirts in bright light, oversized logos, and loud accessories. Off-white, pale blue, light gray, and navy hold detail well in soft daylight.
Do I need to edit my headshot, or can I use it straight out of the camera?
A few small edits help. Heavy editing hurts. Adjust exposure to brighten or darken the whole image, raise shadows gently, sharpen the eyes only, and skip the skin-smoothing. Or upload to a platform that handles enhancement for you without changing what you look like.
How is an AI-enhanced headshot different from an AI-generated one?
An AI-enhanced headshot starts with a real photo of you and applies enhancement (lighting balance, background cleanup, color correction, sharpening) without changing your appearance. AI edited, not generated. An AI-generated headshot creates an entirely synthetic image trained on photos of you, which often drifts from your actual appearance enough that the gap shows up when you meet someone in person.
Still have questions? Get in touch and we'll be happy to help!
One photo, every format you need
Upload a single phone photo from your home setup. Get a polished headshot with a clean background, your industry's style, and every output format you need (square for LinkedIn, transparent PNG for badges, signature crop for email). Start free with three credits.